現物はこんな感じだす

カメラモジュールは3つの部品でできてるよ


封空けはここまでにしてセットアップするよ!
desginsparkでセットアップの仕方公開してるから参考にするよ
1.ZIFケーブルをボードにさす
写真の通り、HDMI横のコネクタにさすんだけど、
ZIFケーブルのさす向きだけ気をつけてね

2.カメラを有効にする
カメラを有効にする前にRPIを最新版にするよ!
sudo apt-get update
sudo apt-get upgrade
んで、カメラを有効にするよ!
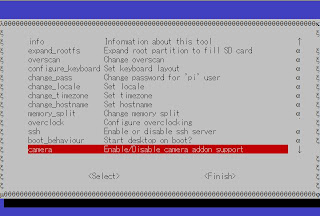
sudo raspi-config
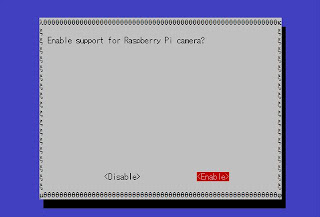
こんな画面が出るから、カメラ選択して

Enable選んでFinishするだけでもうカメラ使える!簡単!

まあこれだけでもいいんだけどね
sudo raspi-config - przechodzimy do camera - enable - reboot
さて、早速撮るよ!
これ打つだけでJPG保存されちゃう。
raspistill -o image.jpg
これ打つだけで10秒動画保存されちゃう
raspivid -o video.h264 -t 10000
とりあえず簡単にセットアップはここまで。
raspividとraspistillのヘルプはこんな感じ
■RaspiVid
RaspiVid Camera App
===================
Display camera output to display, and optionally saves an H264 capture at requested bitrate
usage: RaspiVid [options]
Image parameter commands
-?, --help : This help information
-w, --width : Set image width <size>. Default 1920
-h, --height : Set image height <size>. Default 1080
-b, --bitrate : Set bitrate. Use bits per second (e.g. 10MBits/s would be -b 10000000)
-o, --output : Output filename <filename> (to write to stdout, use '-o -')
-v, --verbose : Output verbose information during run
-t, --timeout : Time (in ms) before takes picture and shuts down. If not specified, set to 5s
-d, --demo : Run a demo mode (cycle through range of camera options, no capture)
-fps, --framerate : Specify the frames per second to record
-e, --penc : Display preview image *after* encoding (shows compression artifacts)
Preview parameter commands
-p, --preview : Preview window settings <'x,y,w,h'>
-f, --fullscreen : Fullscreen preview mode
-n, --nopreview : Do not display a preview window
Image parameter commands
-sh, --sharpness : Set image sharpness (-100 to 100)
-co, --contrast : Set image contrast (-100 to 100)
-br, --brightness : Set image brightness (0 to 100)
-sa, --saturation : Set image saturation (-100 to 100)
-ISO, --ISO : Set capture ISO
-vs, --vstab : Turn on video stablisation
-ev, --ev : Set EV compensation
-ex, --exposure : Set exposure mode (see Notes)
-awb, --awb : Set AWB mode (see Notes)
-ifx, --imxfx : Set image effect (see Notes)
-cfx, --colfx : Set colour effect (U:V)
-mm, --metering : Set metering mode (see Notes)
-rot, --rotation : Set image rotation (0-359)
-hf, --hflip : Set horizontal flip
-vf, --vflip : Set vertical flip
Notes
Exposure mode options :
off,auto,night,nightpreview,backlight,spotlight,sports,snow,beach,verylong,fixedfps,antishake,fireworks
AWB mode options :
off,auto,sun,cloud,shade,tungsten,fluorescent,incandescent,flash,horizon
Image Effect mode options :
none,negative,solarise,sketch,denoise,emboss,oilpaint,hatch,gpen,pastel,watercolour,film,blur,saturation,colourswap,washedout,posterise,colourpoint,colourbalance,cartoon
Metering Mode options :
average,spot,backlit,matrix
************************************************
■RaspiStill
RaspiStill Camera App
=====================
Runs camera for specific time, and take JPG capture at end if requested
usage: RaspiStill [options]
Image parameter commands
-?, --help : This help information
-w, --width : Set image width <size>
-h, --height : Set image height <size>
-q, --quality : Set jpeg quality <0 to 100>
-r, --raw : Add raw bayer data to jpeg metadata
-o, --output : Output filename <filename> (to write to stdout, use '-o -'). If not specified, no file is saved
-v, --verbose : Output verbose information during run
-t, --timeout : Time (in ms) before takes picture and shuts down (if not specified, set to 5s)
-th, --thumb : Set thumbnail parameters (x:y:quality)
-d, --demo : Run a demo mode (cycle through range of camera options, no capture)
-e, --encoding : Encoding to use for output file (jpg, bmp, gif, png)
-x, --exif : EXIF tag to apply to captures (format as 'key=value')
-tl, --timelapse : Timelapse mode. Takes a picture every <t>ms
Preview parameter commands
-p, --preview : Preview window settings <'x,y,w,h'>
-f, --fullscreen : Fullscreen preview mode
-n, --nopreview : Do not display a preview window
Image parameter commands
-sh, --sharpness : Set image sharpness (-100 to 100)
-co, --contrast : Set image contrast (-100 to 100)
-br, --brightness : Set image brightness (0 to 100)
-sa, --saturation : Set image saturation (-100 to 100)
-ISO, --ISO : Set capture ISO
-vs, --vstab : Turn on video stablisation
-ev, --ev : Set EV compensation
-ex, --exposure : Set exposure mode (see Notes)
-awb, --awb : Set AWB mode (see Notes)
-ifx, --imxfx : Set image effect (see Notes)
-cfx, --colfx : Set colour effect (U:V)
-mm, --metering : Set metering mode (see Notes)
-rot, --rotation : Set image rotation (0-359)
-hf, --hflip : Set horizontal flip
-vf, --vflip : Set vertical flip
Notes
Exposure mode options :
off,auto,night,nightpreview,backlight,spotlight,sports,snow,beach,verylong,fixedfps,antishake,fireworks
AWB mode options :
off,auto,sun,cloud,shade,tungsten,fluorescent,incandescent,flash,horizon
Image Effect mode options :
none,negative,solarise,sketch,denoise,emboss,oilpaint,hatch,gpen,pastel,watercolour,film,blur,saturation,colourswap,washedout,posterise,colourpoint,colourbalance,cartoon
Metering Mode options :
average,spot,backlit,matrix
*********************************************
raspistillでexifも扱えるのか。ほむ。
ストリーミングは週末にやってみるよ。
みんな頑張って
0 件のコメント:
コメントを投稿